No hype, just the nuts‑and‑bolts to get a Raspberry Pi acoustic monitor working in rain.
The biggest obstacle to a reliable outdoor BirdNET‑Pi station isn’t the software—it’s keeping a cheap lavalier microphone from turning the whole box into a soggy mess. Below is a step‑by‑step, no‑fluff guide that solves the water‑infiltration problem with a few pieces of tape, a clamp, and a homemade acoustic shield.
What is BirdNET‑Pi and what hardware do you really need?
BirdNET‑Pi runs the BirdNET AI model on a Raspberry Pi and continuously records audio to identify birds in real time. The software package includes everything required to turn a Pi into a 24/7 acoustic sensor as described by the Ancona family, and the community has already published full‑build tutorials on PixCams.
Required hardware (keep it simple):
- Raspberry Pi 4 (or any Pi that can run Docker)
- Micro‑USB power supply with weather‑proof inlet (e.g., IP‑rated bulkhead)
- Standard outdoor weatherproof electrical box (≥ 65 mm deep, gasketed lid)
- Omnidirectional lavalier microphone (18 AWG wire, cheap but fragile)
- USB sound card or a USB mic if you prefer a plug‑and‑play device—see the guide above
Everything else is DIY: a clamp, some electrical tape, silicone, and a repurposed seedling pot for the acoustic shield.
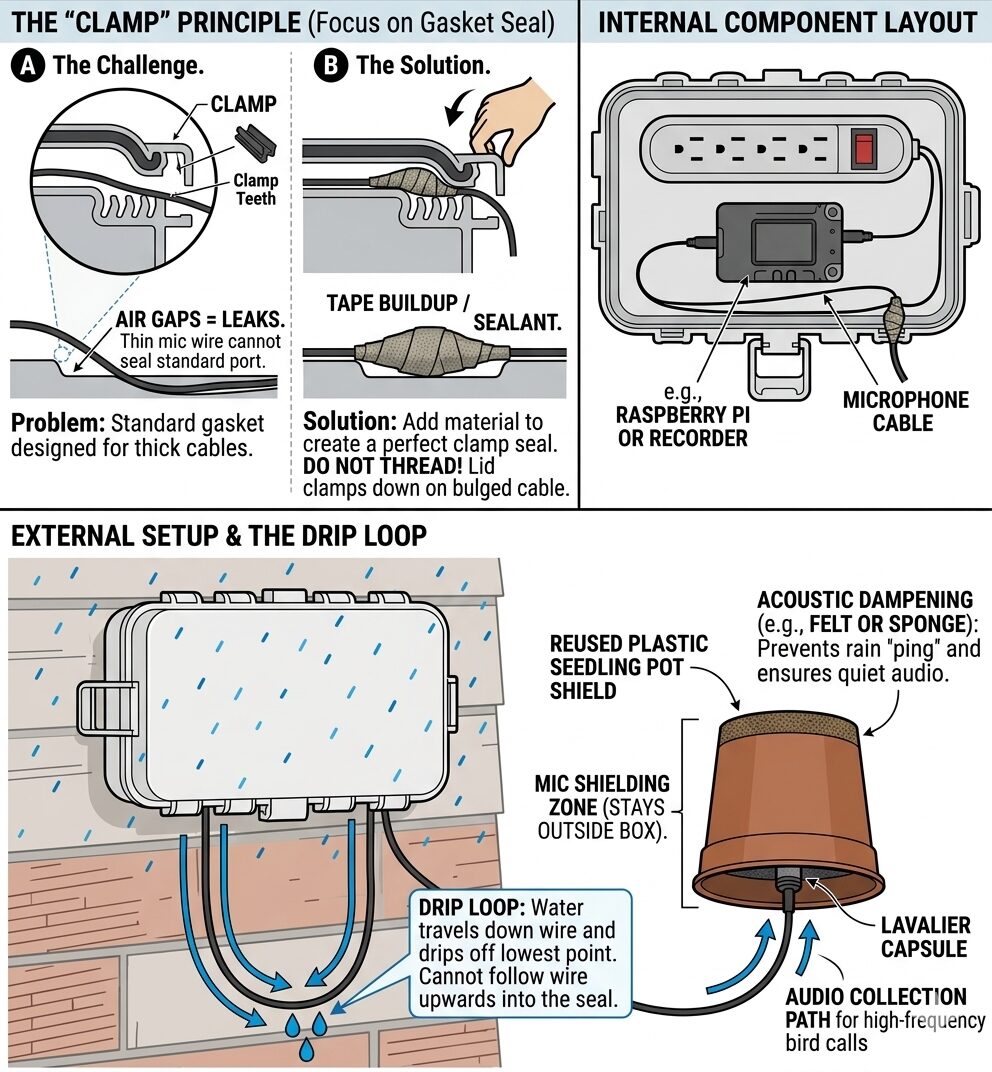
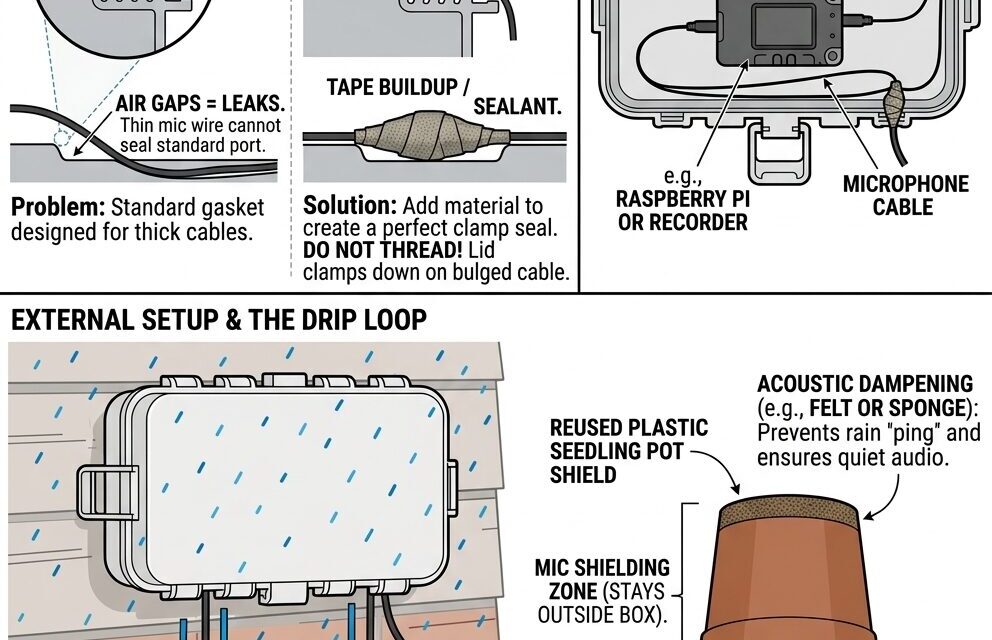
Why do thin lavalier wires betray weatherproof boxes?
The gasket that seals a weatherproof box is designed to compress around solid, uniform objects—think a conduit or a bulkhead connector. An 18 AWG lavalier cable is:
- Too thin to push the gasket into a tight seal; the rubber simply rolls around the wire.
- Flexible enough to flex under wind, creating micro‑gaps that let water wick in.
- Uninsulated along most of its length, so any moisture that reaches the seal can travel right to the microphone connector.
Community experience makes this clear: “making microphones waterproof and setting them up for long‑lasting field monitoring is the hardest part of the whole thing!” —GitHub discussion. Ignoring the seal’s limitations leads to condensation, corrosion, and eventually a dead Pi.
How does the clamp‑and‑tape method seal the cable without drilling?
Instead of forcing the thin wire through a pre‑drilled hole (which almost always fails), bulk up the cable and let the box’s existing clamshell gasket do the work.
- Create a cable bundle
- Gather the mic lead and a short length of 22 AWG stranded wire (or a spare USB cable) to add bulk.
Wrap the joint tightly with electrical tape (≈ 3 turns) and coat it with a thin bead of silicone sealant. This forms a water‑resistant “plug” that the gasket can compress against.
Position the bundle
Feed the bulked cable through the gasket opening just enough to sit inside the box. Do not thread the mic capsule through the hole; the capsule stays outside.
Clamp it
- Use a small U‑shaped spring clamp or a zip‑tie that sits on top of the gasket. Tighten until the gasket is fully depressed around the taped bundle. The pressure eliminates gaps and creates a waterproof seal without permanent modifications.
⚠️ Critical warning
If the tape or silicone isn’t fully cured before sealing, moisture can still seep behind the gasket and corrode the Pi’s GPIO pins. Let the silicone cure for at least 24 hours in a dry environment before mounting the box outdoors.
What is the proper drip‑loop and why is it non‑negotiable?
Water follows the path of least resistance. A straight cable entering a box becomes a wicking conduit, channeling rain directly to the seal. The solution is a U‑shaped “drip loop” that forces water to fall away before it reaches the gasket.
Build the loop:
- Pull the cable out of the box, then bend it into a generous “U” (≈ 5 cm deep).
- Secure the loop with a small cable tie or a piece of self‑adhesive cable clamp positioned outside the box.
- Ensure the loop hangs lower than any roof overhang to avoid water pooling.
Plain‑English physics: When rain runs down the cable, gravity pulls it into the low point of the “U”. The water collects there, then drips off the side of the loop, never reaching the sealed entry point. Skipping the loop is the fastest way to turn a weatherproof box into a fish tank.
How can you DIY a rain shield that silences rain‑drumming?
Even with a perfect seal, the microphone capsule will pick up the “rain drumming” noise when droplets hit the mic housing. A simple, low‑cost shield eliminates this acoustic clutter.
Materials (all recyclable):
- Plastic seedling pot (≈ 10 cm diameter, clear or white)
- Old kitchen sponge or felt (thin enough to conform to the pot’s interior)
- Hot‑glue gun or silicone
- Small zip‑tie or Velcro strap
Construction steps:
- Cut the pot’s bottom off with a utility knife, leaving a shallow bowl.
- Line the interior with a 2‑mm slice of sponge or felt. This dampens the impact of raindrops, turning sharp “ping” sounds into a muffled thud.
- Mount the mic
- Thread the mic cable through the side of the pot (use a 3‑mm drill hole, then seal with silicone).
- Position the mic capsule at the center of the pot, pointing upward.
- Secure the shield to the box’s exterior with a zip‑tie that loops around the box’s mounting brackets. Make sure the shield sits above the drip loop so any water that lands on the shield can run off the sides rather than into the loop.
Result: The shield acts like a tiny umbrella that also absorbs the kinetic energy of raindrops, dramatically reducing false bird detections caused by rain noise.
How do you wire, power, and test the finished station?
- Power: Run a DC‑rated bulkhead connector into the box, seal with silicone, and connect to a 5 V/3 A power brick.
- Network: Use a short Cat‑5e patch cable with an outdoor‑rated RJ45 bulkhead; seal the same way as the mic.
- Software: Flash a fresh Raspberry Pi OS image, enable SSH, then follow the official BirdNET‑Pi install script (the repo provides a one‑liner). Verify the USB sound card appears with
arecord -l. - Dry run: Before mounting outdoors, power the box in a dry garage and run
birdnet-pifor 10 minutes. Check the log for “mic detected” and ensure no clipping. - Final placement: Mount the box on a pole or tree at 2–3 m height, facing away from direct sunlight to avoid overheating. Verify the drip loop hangs freely and the acoustic shield is not obstructed.
Ready to share your own tweaks or troubleshoot a stubborn leak?
If you’ve tried the clamp‑and‑tape method, built a drip loop, or crafted a rain shield and ran into a hiccup, drop a comment below. Let’s swap field notes, improve the design, and keep our BirdNET‑Pi stations humming through the next storm.

