
One of the frequent questions on forums for Node-RED and Home Assistant is how to make use of the images and videos that MotionEye saves when it detects motion from a security camera. Users don’t want the images and videos to be trapped in the MotionEye server they want to send them to themselves or another server for viewing. We’ll show you how to take advantage of all the part to make this work for you using some automation from Node-RED and it’s ability to send data to nodes that will deliver the media to you.
Webhooks and Node-RED
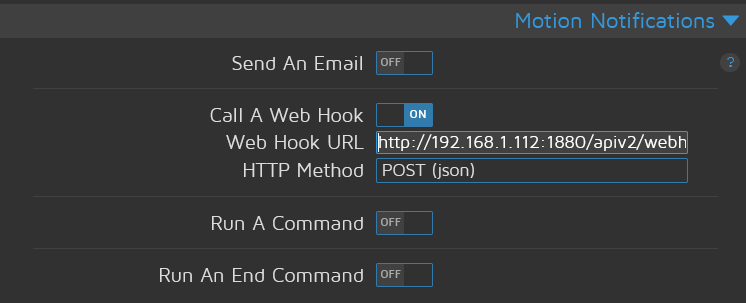
One of the easiest ways to take advantage of the automation that MotionEye gives you is to call a webhook when MotionEye senses motion on one of the cameras. You can do this in the settings panel for the camera in question by hitting the wrench icon on the image shown below.

Basically a webhook is a call to a URL using one of the standard methods to send or receive data from a web server. It’s much like browsing the web in your browser or submitting a web site form, data is exchanged between you and the server and typically there is an action on one end due to the exchange. The webhook take the idea a step further and by definition it means an action gets executed on the server (or it’s implied in the definition of webhook).

What we are going to do is define what the actions are on the server side by using Node-RED’s automation capabilities.
Building our Webhook
Before we can tell MotionEye to call a webhoook in the settings UI we need to define the webhook – it’s basically a prerequisite. Once we have it defined we can use a Node-RED debugging node to see what MotionEye sends over when it calls the webhook.
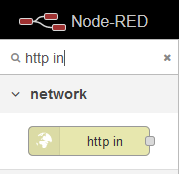
To start, we’ll need an HTTP in node from the Node-RED pallet – let’s grab it and drag it into our layout;
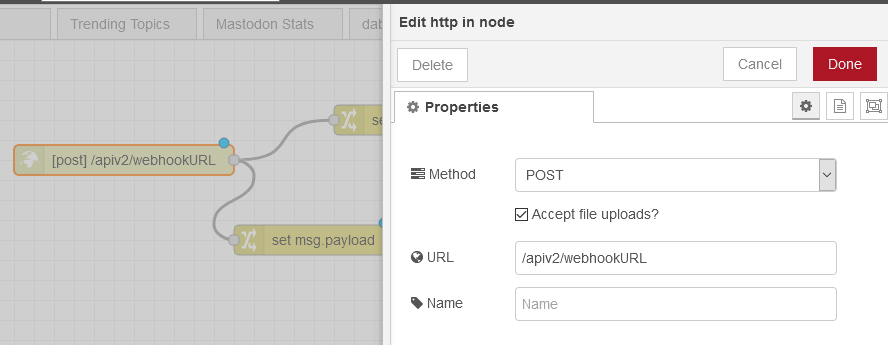
Then we need to define the URL endpoint for our webhook. In the example below we are using /apiv2/webhookURL. This will translate into a full webhook URL like the one below (assuming Node-RED is not exposed to the internet and only accepting connections on the local network):
http://192.168.1.112:1880/apiv2/webhookURLAnd here is how we configured the Node-RED HTTP in Node for our webhook;
Testing the Webhook Endpoint
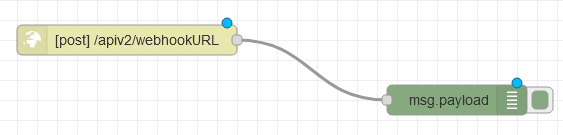
Besides going in front of your cameras and jumping up and down we can test the endpoint and see what happens, that it’s up and running in a few ways. First, let’s add debugging to our flow so we can see what happens on the automation server when we call the webhook. We do this by dragging in a debug node and attaching it to our HTTP in node as shown below;
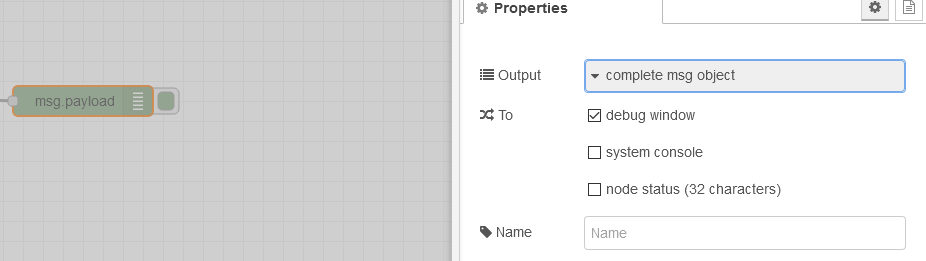
And we’re going to make a change now to make debugging easier and on our debug node we’re going to set it to show the full data payload and not just the msg.payload information;
Now we’re set to test and debug the output of our webhook which will guide us along the way later as you’ll see. Let’s deploy our changes in Node-RED to make them live on the top right using the Deploy button.
We can first test that the webhook is reachable by just visiting the URL we created above, http://192.168.1.112:1880/apiv2/webhookURL, in our browser. If you get an error on the page like the below, you know it’s reachable;
Cannot GET /apiv2/webhookURL
Now that we get a response, even a bad one, we can see what happens in Node-RED. If you visit debugging in Node-RED at this point you’ll see there is no output because we caused an error. We can now start using CURL to test what happens when we send an HTTP call with the proper method. This is entirely optional at this point and we could just move into using MotionEye to send the response.
Using CURL to test a webhook (optional)
Most Linux distributions already have CURL installed and if you’re like me and running Debian you might have to install it if you went with the slimmer install option;
sudo apt install curlNow you have CURL installed and can call the webhook endpoint from the CLI to test. We do this by crafting a CURL call that is a POST call to our new favorite URL;
curl -X POST http://192.168.1.112:1880/apiv2/webhookURLGo ahead and run the above command in the command line of your Linux install. It will appear to not complete, go ahead and hit CTRL+C to close it and go back to Node-RED’s admin UI.
In the debugging panel you’ll now see output from out debugging node showing what the endpoint saw from your CURL command;
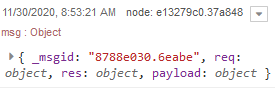
And if we expanded that data we’d see the below;
{"_msgid":"8788e030.6eabe","req":{"_readableState":{"objectMode":false,"highWaterMark":16384,"buffer":{"head":null,"tail":null,"length":0},"length":0,"pipes":null,"pipesCount":0,"flowing":null,"ended":true,"endEmitted":false,"reading":false,"sync":true,"needReadable":false,"emittedReadable":false,"readableListening":false,"resumeScheduled":false,"paused":true,"emitClose":true,"autoDestroy":false,"destroyed":false,"defaultEncoding":"utf8","awaitDrain":0,"readingMore":true,"decoder":null,"encoding":null},"readable":true,"_events":{},"_eventsCount":1,"socket":"[internal]","connection":"[internal]","httpVersionMajor":1,"httpVersionMinor":1,"httpVersion":"1.1","complete":true,"headers":{"host":"192.168.1.112:1880","user-agent":"curl/7.64.0","accept":"*/*"},"rawHeaders":["Host","192.168.1.112:1880","User-Agent","curl/7.64.0","Accept","*/*"],"trailers":{},"rawTrailers":[],"aborted":false,"upgrade":false,"url":"/apiv2/webhookURL","method":"POST","statusCode":null,"statusMessage":null,"client":"[internal]","_consuming":false,"_dumped":false,"baseUrl":"","originalUrl":"/apiv2/webhookURL","_parsedUrl":{"protocol":null,"slashes":null,"auth":null,"host":null,"port":null,"hostname":null,"hash":null,"search":null,"query":null,"pathname":"/apiv2/webhookURL","path":"/apiv2/webhookURL","href":"/apiv2/webhookURL","_raw":"/apiv2/webhookURL"},"params":{},"query":{},"res":"[internal]","route":{"path":"/apiv2/webhookURL","stack":[{"name":"cookieParser","keys":[],"regexp":{"fast_star":false,"fast_slash":false},"method":"post"},{"name":"httpMiddleware","keys":[],"regexp":{"fast_star":false,"fast_slash":false},"method":"post"},{"name":"corsMiddleware","keys":[],"regexp":{"fast_star":false,"fast_slash":false},"method":"post"},{"name":"metricsHandler","keys":[],"regexp":{"fast_star":false,"fast_slash":false},"method":"post"},{"name":"jsonParser","keys":[],"regexp":{"fast_star":false,"fast_slash":false},"method":"post"},{"name":"urlencodedParser","keys":[],"regexp":{"fast_star":false,"fast_slash":false},"method":"post"},{"name":"multipartParser","keys":[],"regexp":{"fast_star":false,"fast_slash":false},"method":"post"},{"name":"rawBodyParser","keys":[],"regexp":{"fast_star":false,"fast_slash":false},"method":"post"},{"name":"<anonymous>","keys":[],"regexp":{"fast_star":false,"fast_slash":false},"method":"post"},{"name":"<anonymous>","keys":[],"regexp":{"fast_star":false,"fast_slash":false},"method":"post"}],"methods":{"post":true}},"cookies":{},"signedCookies":{},"body":{},"_body":true},"res":{},"payload":{}}Wow, that’s a lot of data! Luckly we only need a few parts of this. Let’s do this all again but instead of using CURL we’ll start using MotionEye to make the webhook call instead. This will give us valuable debugging information that we can start using in our flow.
Setting MotionEye to Send Webhooks
Just as easy it was to setup the webhook in Node-RED it’s just as easy to call the webhook in MotionEye when it detects motion from a camera. Really all we need to do is copy and paste the URL into the settings panel for the security camera in question, the same one we used in the CURL example above.
http://192.168.1.112:1880/apiv2/webhookURLWe’re going to throw a curve ball here and add a URL argument to the webhook to be interpreted by Node-RED upon receiving the call.
http://192.168.1.112:1880/apiv2/webhookURL?%fNotice what we did – we added ?%f to the end of the URL. Though this isn’t well documented and isn’t in the MotionEye UI what this will do is append the name of the file to the end of the URL, so it looks more like this when the call gets made;
http://192.168.1.112:1880/apiv2/webhookURL?/mnt/xstore/motion-porch/2020-11-30/08-09-07.mp4Now what we’ve done is basically constructed a URL that does two things – it will let MotionEye tell Node-RED when something happened so Node-RED can kick off a series of events – but we can also tell the endpoint more information about the event (in our case, the file generated from it).
Let’s have MotionEye detect motion and send the webhook so we can see the debug output. We’ll want to know where the name of the file goes and grab it to use in our flow. What we’ll need to do is setup MotionEye to call the webhook and then watch the debugging. To do this we paste the URL into the section we showed up top;
Now what you’ll get in the debug node is the query string information we added earlier, the filename will come through instead of “%f“. If you are lucky each time you save the changes in MotionEye the camera will reinitialize and it will think there was motion – if so you’ll see the output in your Node-RED debug node.
Just to skip ahead we won’t analyze each part of the debugging data. It’s all there for you to explore. You can do more stuff like send the date and time as a URL argument but we’ll keep it simple for now.
Parsing the Output in Node-RED
Now that we have MotionEye making a webhook call when there is motion and we have Node-RED accepting that call we can start picking apart the information we receive and start using it in our flow.
What we need to do is start setting values and picking apart the data. In our example we’re going to post the information to Mastodon so we’ll need two part of information – the text of our toot and the image or video we want to post.
Let’s add two change nodes to our flow after the HTTP in node and connect them to the node we started with;
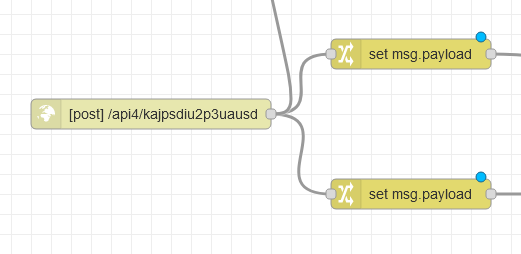
Our Mastodon node, that posts the toots, will need two message payloads combined; msg.payload.text and msg.payload.image. Let’s look at the part of our flow to set msg.payload.text first.
On the first node attached to the HTTP in, we’ll start setting up our text going to our toot (or your Telegram message!). Basically we’re just going to change msg.payload to a text string by using the change node’s “Set” function.
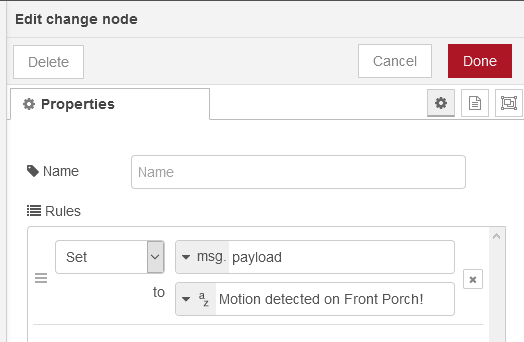
Now that we have changed, in this portion of our flow, msg.payload and have basically overridden what is coming from the input (our webhook) we just use the next node to move it to msg.payload.text required for the Mastodon API node later.
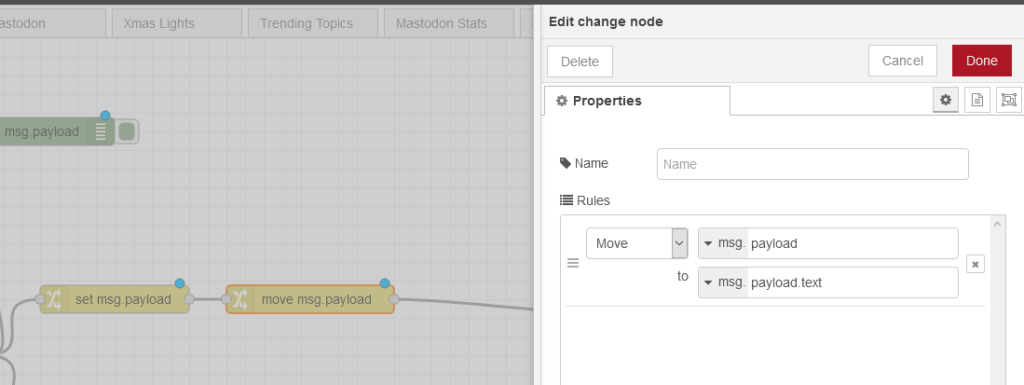
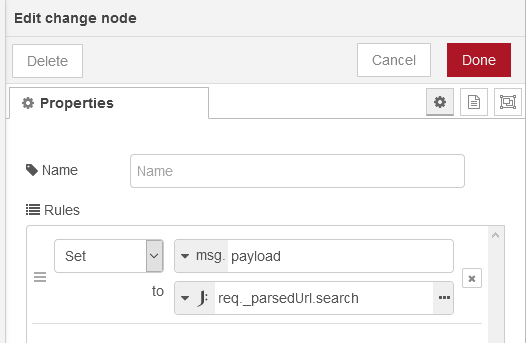
Now we’ll look at the other half of our flow – pulling the image location from the webhook’s URL and changing this information so it’s usable in our flow.
If you remember we mentioned there are two change nodes from the HTTP in node (and we showed the above). In the second of the two, what we’re going to do is pull out an element of the giant debugging information we looked at earlier – we are after the req.__parsedURL.search information. This is where in the JSON our file name is.
There is just one small problem, a single character problem. There is an extra question mark at the front of our filename. If you added a debugging node after the one we built above you might see it. We can easily strip off the first character of the string by using a Node-RED function node and some JavaScript. Drag the function node to your flow and place it behind the one above and attach it.
In our function node we’ll use the JavaScript function slice to trim off the first character of the msg.payload and return the rest to the next node in our running flow;
msg.payload = msg.payload.slice(1);
return msg;
Your flow should start looking like this;
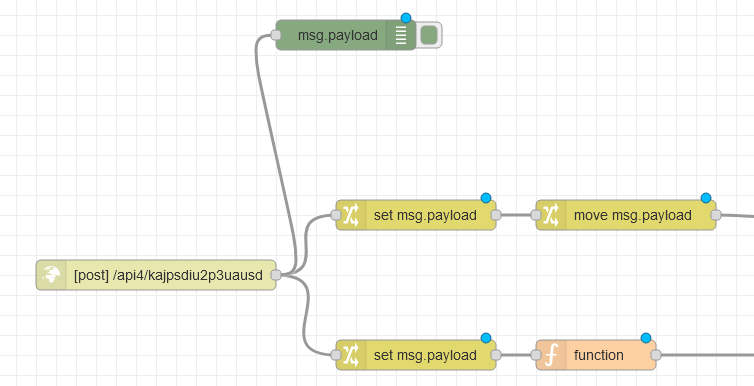
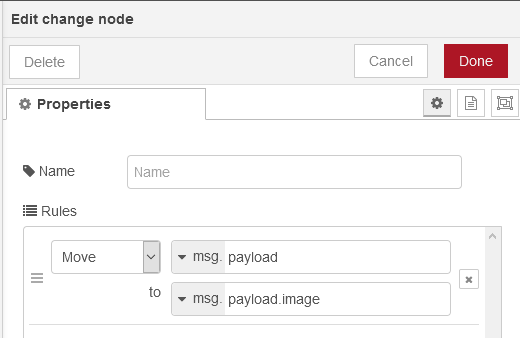
Just like we did before, we need to start shifting our msg.payload information around and our Mastodon API node will need the image to be in a specific part of the JSON message (msg.payload.image) and the text of the toot to be in a different node of the JSON (msg.payload.text). To do this will just use another change node and move msg.payload to msg.payload.image;
Now we are basically setup – we have two portions of the flow that creates a string message “Motion detected” or something similar applied to msg.payload.text and we have our image location (file name including full path) in msg.payload.image – we are ready to put the messages together with a join node.
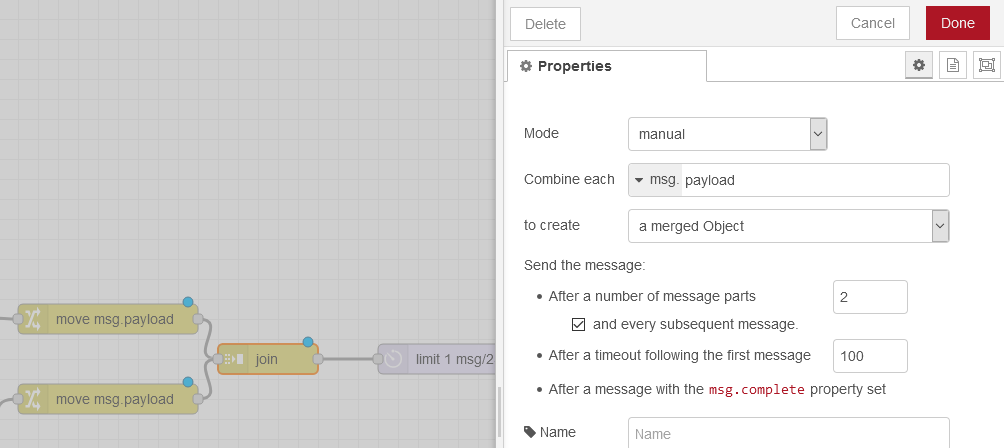
This trick I discovered after trying to do this all in one leg of the flow – unsuccessfully. By bifurcating our flow into two parts we can set both messages independently and then put them back together later. Remember we are working on two parts of the same message so the join node here comes in handy. Were just going to use the manual mode and select the option to create a merged object in this section. For extra issue handling with MotionEye let’s set this node to send on it’s data when 2 messages are received or 100 seconds goes by.
If you were to debug here you should see a JSON message that has two parts of course. We’re ready to now post to Mastodon!
Posting to Mastodon with Node-RED
Posting to Mastodon couldn’t be easier with Node-RED since Mastodon is API friendly and there is already a Node-RED pallet node to use. All you’ll need is to create an access token for your Mastodon account and then paste it into Node-RED. You can do this by visiting Settings and then Development and creating a new application (https://yourmastodoninsance.social/settings/applications).
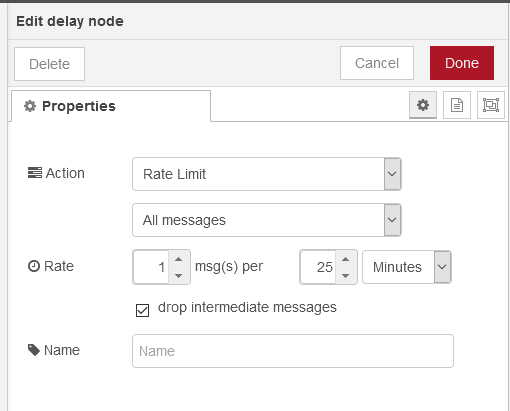
But before we do that let’s setup some rate limiting on what we’re going to post. We can do this in Node-RED with a delay node – by setting the action to rate limit. We want to be sure we’re not posting messages every few seconds and angering our followers and this might happen depending on your motion settings.
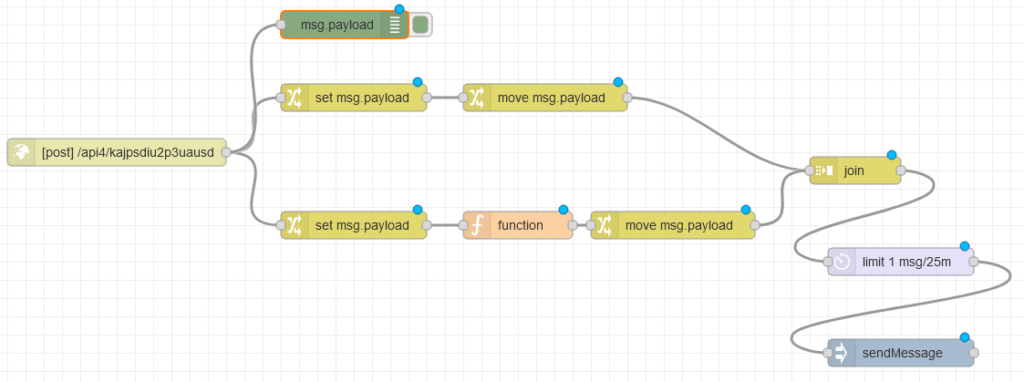
Now we’re ready to drop in our Mastodon sendMessage node into Node-RED and start sending our first message! You should have a flow similar to the one below once you do (before setting up the sendMessage node);
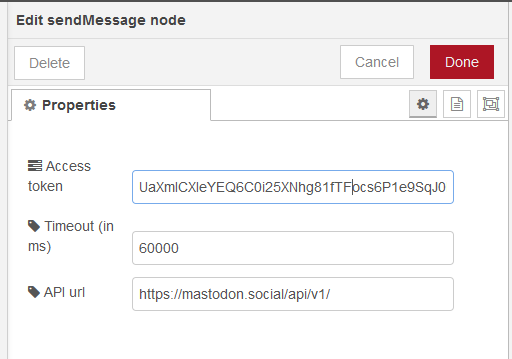
Configuring sendMessage just needs the API endpoint of your Mastodon server and the Access Token you generated when creating a new app tied to your Mastodon login.
Deploy your flow and sit back, it’s all working. Here’s an example toot to show you what you should see in Mastodon!
Expanding Your Motion Eye Security System: Unlocking Limitless Possibilities
Now that you’ve successfully configured Motion Eye to send webhooks to Node Red, and subsequently share images on Mastodon, you’ve laid a solid foundation for an intelligent and dynamic security camera system. However, the journey doesn’t end here—instead, it’s an invitation to explore the vast realm of AI image detection systems and APIs.
Embrace the Power of AI Image Analysis
With Node Red as your orchestrator, you have the flexibility to integrate various AI-driven image analysis tools into your security pipeline. Imagine the possibilities:
1. Package Detection:
Utilize AI algorithms to detect packages or objects in the camera feed. Receive instant notifications when a package is detected, enhancing your awareness of any unusual activity.
2. Person Detection:
3. Facial Recognition with Azure:
Building Your Customized AI Security Solution
The beauty of Node Red is its versatility and extensibility. Here’s a simplified guide to expanding your system with AI capabilities:
- Research AI Services: Explore AI image detection services and APIs available in the market. Popular platforms include Google Cloud Vision API, AWS Rekognition, and Microsoft Azure Cognitive Services.
- Obtain API Keys: Sign up for the chosen AI service, obtain API keys, and configure them within Node Red for seamless integration.
- Node Red Integration: Use Node Red’s intuitive interface to create flows that connect your Motion Eye camera feed with the AI image detection service. This might involve adding nodes for HTTP requests, parsing responses, and making decisions based on the analysis.
- Customize Notifications: Tailor notifications based on AI detections. Whether it’s sending an alert when a person is detected or triggering actions for specific objects, Node Red allows you to create a personalized and responsive security system.
The Sky’s the Limit
By integrating AI image detection into your Motion Eye setup, you’re not just monitoring; you’re creating an intelligent and proactive security solution. The options are limitless, and the power is in your hands. Experiment, explore, and discover how AI can elevate your security camera system to new heights.
Remember, technology is ever-evolving, so stay curious and stay secure!


Hi, i have tried this and the payload is empty, is there something missing ?