To side-step the discussions on setting up your own home automation server a little bit I’d like to share how I got the Yi Cam Outdoor working with MotionEye and Home Assistant.
Connecting Any RTSP Camera to MotionEye and Home Assistant
MotionEye is a powerful open-source video monitoring application that can be used to manage multiple RTSP cameras. Home Assistant is a versatile home automation platform that can be integrated with MotionEye to provide a comprehensive surveillance solution.
Prerequisites
Before you begin, you will need the following:
- An RTSP camera
- A device running MotionEye
- A Home Assistant instance
Connecting the RTSP Camera to MotionEye
- Gather the camera’s RTSP URL: Consult the camera’s documentation or manufacturer’s website to obtain the correct RTSP URL. This URL typically includes the camera’s IP address, the RTSP protocol identifier, and the stream path.
- Access MotionEye’s web interface: Open a web browser and navigate to the MotionEye web interface, usually accessible at http://[MotionEye_IP_Address]:8081.
- Add a new camera: Click the “+” icon in the top left corner and select “Add a new camera.”
- Configure the camera: Enter a descriptive name for the camera, paste the RTSP URL into the “URL” field, and select the appropriate “Video codec” option.
- Save the configuration: Click the “Save” button to save the camera configuration.
Integrating MotionEye with Home Assistant
- Install the MotionEye integration: In Home Assistant, navigate to Integrations and search for “MotionEye.” Click on the “MotionEye” integration and follow the instructions to install it.
- Configure the MotionEye integration: Enter the IP address of your MotionEye instance and provide a name for the integration.
- Save the configuration: Click the “Save” button to save the integration configuration.
Using the RTSP Camera in Home Assistant
- View the camera feed: Once the camera is added to Home Assistant, you can view its live feed by clicking on the camera entity in your dashboard.
- Automate with camera events: You can also automate actions based on events detected by the RTSP camera. For instance, you could trigger a light to turn on when the camera detects motion.
This setup allows you to seamlessly integrate your RTSP camera into your Home Assistant ecosystem, enabling you to monitor your surroundings and automate actions based on camera events.
MotionEye
MotionEye is a home surveillance program that runs on Linux, the Raspberry Pi (including the Pi zero) and other embedded platforms. It is a great piece of software that is highly underrated. It runs natively on Linux as well, with just really Python as a dependency (as opposed to others which require dot net or otherwise un-optimized for Linux).
Setting up MotionEye (Debian 10)
Installing MotionEye in Debian is easy and can be done with apt and pip for Python as opposed to other packages that require either their sources added to your Debian system or even downloading and compiling them yourself.
To do so we’ll install the software required by MotionEye including FFMPEG, Motion, and some base packages including Python’s pip installer;
sudo apt install motion ffmpeg v4l-utils python-pip python-dev python-setuptools curl libssl-dev libcurl4-openssl-dev libjpeg-dev libz-devNow we’re ready to install MotionEye on Debian – but to do so we should note that the official installer doesn’t note to install MotionEye as root, but without doing so we couldn’t get it to run properly;
sudo pip install motioneyeNow the MotionEye framework is installed on your machine and you’re almost ready to setup your first camera. You’ll just need to prepare the setup configuration files by copying over the example files that came with MotionEye.
This can be done with just two important commands, make the directory and copy the sample file there – we’ll do it in one line.
sudo mkdir -p /etc/motioneye && sudo cp /usr/local/share/motioneye/extra/motioneye.conf.sample /etc/motioneye/motioneye.confAdding MotionEye as a systemd Service
We’re done setting up MotionEye and we could go to the webpage and configure it, but we should first setup MotionEye to run as a system service. Python packages don’t always install themselves this way when using pip so we must use an example and install it ourselves.
Copy the example over into the systemd services directory;
sudo cp /usr/local/share/motioneye/extra/motioneye.systemd-unit-local /etc/systemd/system/motioneye.serviceThen reload the systemd daemon;
sudo systemctl daemon-reloadThen enable the newly created MotionEye systemd service (the one we copied over from the example above) – this enables us to use the start, stop and restart commands on MotionEye;
sudo systemctl enable motioneyeNow we’re ready to start MotionEye as a systemd service in Debian;
sudo systemctl start motioneyeAdding Cameras to MotionEye
Getting an RTSP Stream
First we’ll need a running network camera. We’ll assume that we’ve already setup a hacked Yi Cam (or Wyze cam) that has RTSP enabled and running. If you followed the guide and paid for the RTSP license you’ll be all set. To double check we can do two things.
Let’s first visit the webcam’s RTSP settings page. If you’ve not changed the default hostname from the Yi Cam hack you can find it by using this link (http://yi-hack-v4/?page=rtsp).
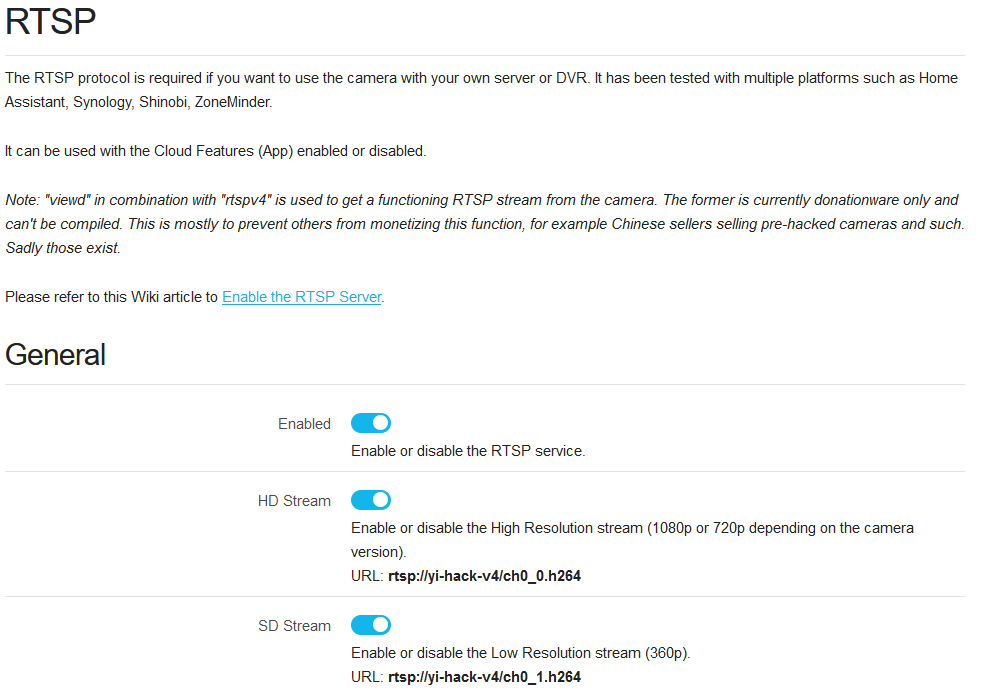
On this page you’ll find the URL to the HD stream, which we’ll be using;
rtsp://yi-hack-v4/ch0_0.h264Testing the RTSP Stream with VLC Player
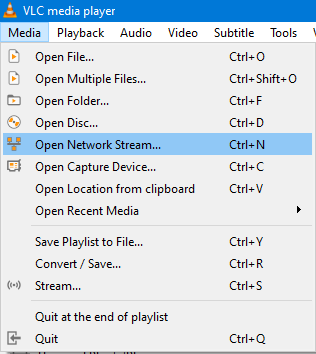
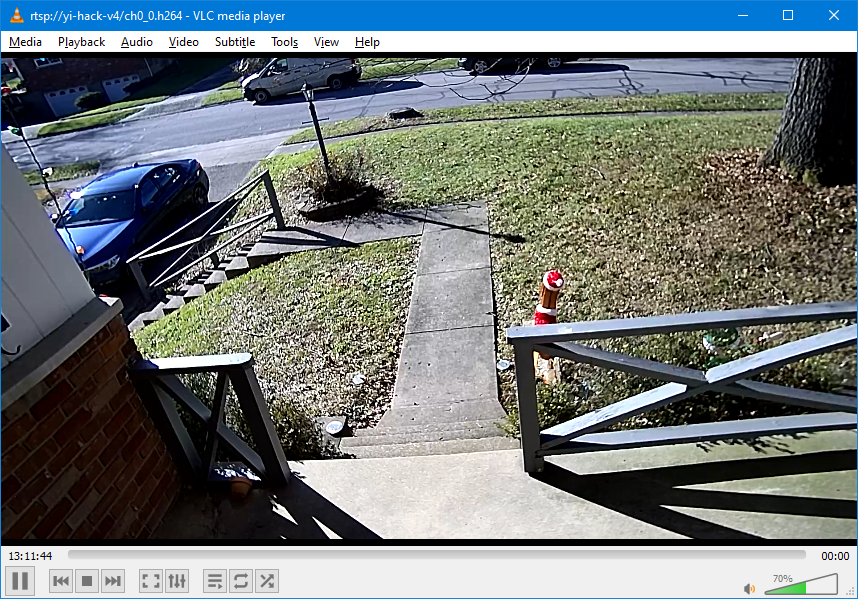
Now that we’ve confirmed the camera has enabled streaming we need to test it. Unfortunately unlike the Wyze camera hack we can’t see the output of the camera, what it’s capturing, on the webpage for the setup. Instead we can use VLC Player to open a network stream (our RTSP stream) and preview it there.
After downloading and installing VLC, if you don’t already have it, select Open Network Stream from the Media menu (or use the hotkey CTRL+N);
And in here we’ll paste the URL to the RTSP stream coming from the Yi cam outdoor;
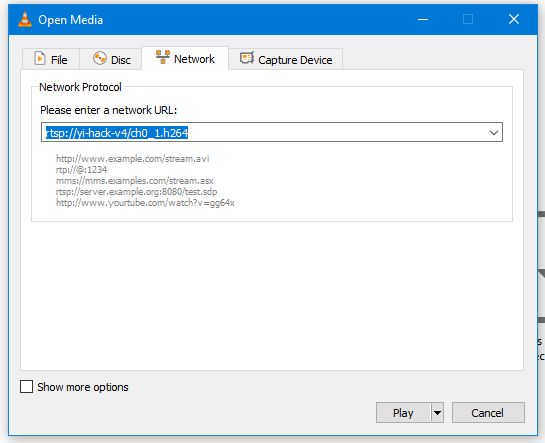
And when we hit Play we’ll be able to see what the Yi cam sees!
Adding the RTSP Stream to MotionEye Web UI
We’ve not yet visited the page for MotionEye and not set it up at all. What we need to do is simply setup our first camera and we can play with the motion detection and other fun settings later. Let’s get MotionEye to see the RTSP stream and even pass it’s data onto Home Assistant so we can see the video stream there as well. This will give us a central place, Home Assistant, to monitor not only our other integrated devices but our security cameras too.
First, let’s visit the MotionEye URL. This will be dependent on your setup but you’ll be able to find the page by visiting a URL like the below:
http://192.168.1.112:8765Simply replace the IP address in the above with your own or use localhost if you’re still sitting at the computer you’ve installed MotionEye on. To login for the first time use the MotionEye default username and password;
Username: admin
Password: (leave blank)
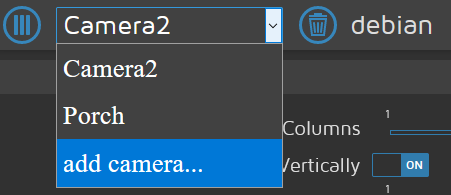
Adding the Camera
Now that you’ve logged in you’ll see the default page without any cameras. To add your first one hit the hamburger menu on the top left and then select ‘add camera’ as shown in the screenshot below;
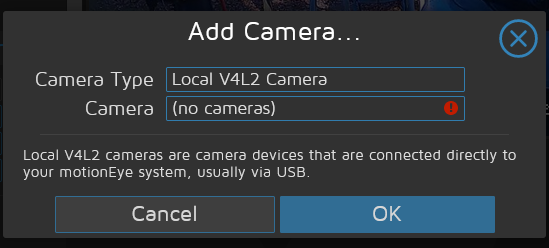
This will pop up the box below, we’ll need to change the default;
And we’ll select “Network Camera” from the Camera Type drop down. In the URL fields we’ll paste in the same URL we used to test the RTSP stream in VLC (rtsp://yi-hack-v4/ch0_0.h264 for HD) and finally we can optionally select RTSP/UDP Camera from the Camera option at the bottom before saving;
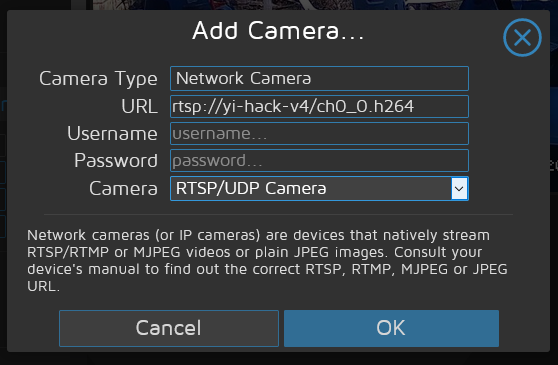
Once we hit OK we’ll have the camera in MotionEye showing what is on the Yi cam outdoor (and any other cameras should we add them here – notice below I have two Yi cameras added to MotionEye).
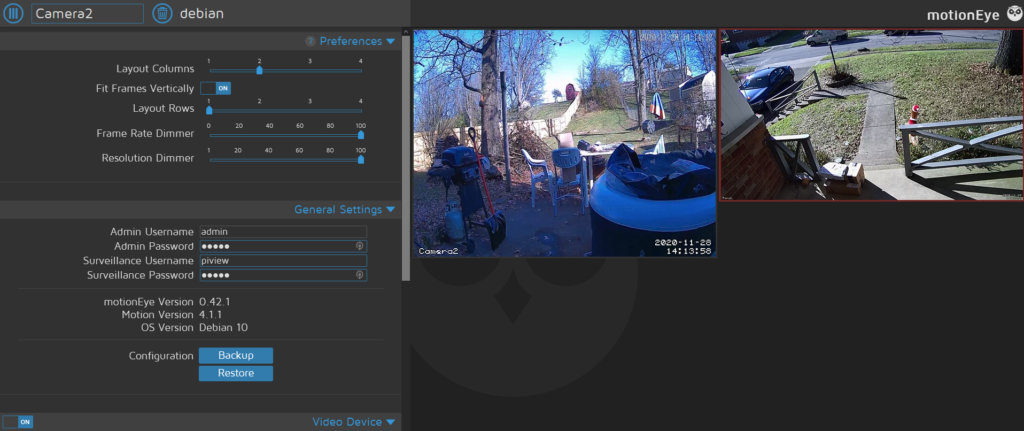
You now can setup motion detection and other options in the web UI for MotionEye – the core of the software’s power. We’ll forgo those for now and possibly dig into MotionEye’s powerful options in another post. For now let’s move onto enabling these same cameras in Home Assistant.
Setting Up Cameras in Home Assistant
As with all lame things we think setting up a camera in Home Assistant is easy to do as well. You’ll have to edit the configuration.yaml file to add the cameras but we’ve set everything up until this point that we’re almost to copying and pasting a few things to finish up.
First thing we’ll need to do is open the configuration.yaml for Home Assistant, where all the device integration and other settings are stored. After opening it we’ll want to place the following high-level lines to the configuration to lay the foundation for the cameras to appear – we’ll show you what to modify as we go;
camera:
  - platform: mjpeg
    name: Backyard
    still_image_url: http://debian:8765/picture/2/current/?_username=master&_signature=63basdffasdf0fasdf3b4f4asdf53d45
    mjpeg_url: http://debian:8082
What we need to change here we’ll get, actually, from MotionEye. Go back to MotionEye and open up the camera configuration (click the preview video, then the wrench to bring up the settings panel). Then scroll down on the left and make sure that Video Streaming is enabled as shown below;
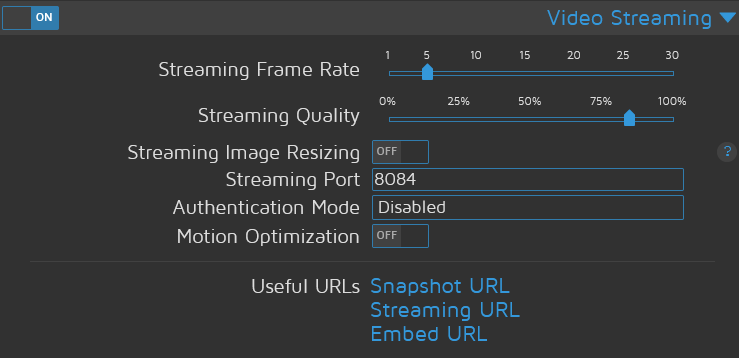
You will simply need two links from this area to paste into your configuration.yaml file for Home Assistant. You’ll want to bring up the Streaming URL to paste into the mjpeg_url option and you’ll want to copy the Snapshot URL for the still_image_url option.
Once you’ve updated the configuration.yaml file you can go ahead and restart Home Assistant, either with Docker or by restarting it visiting Configuration – Server Controls in the Lovelace UI.
Adding the Cameras to Lovelace
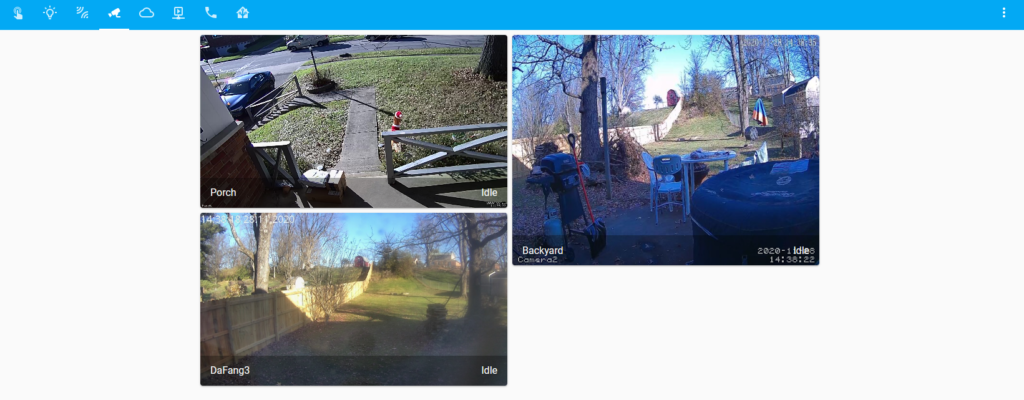
You’ve now have an active RTSP camera on your network. It’s also tied into MotionEye and you’re ready to start detecting motion events and saving snapshots or videos of those detected events. We also have setup Home Assistant to be able to pull the MJPEG stream that Motion Eye produces into the Home Assistant UI, Lovelace.
Now that we’ve done the hard work we’re ready to finish up by adding a new camera component to Home Assistant. Go ahead and put Lovelace into configuration mode and select Add Card at the bottom right of the page.
Then we need to select the entities or cards we want to insert. We like to do this by selecting the cameras by entity, instead of by card type. Switch over to the By Entity tab as shown below and type “camera” to narrow down the list;

Since Home Assistant is the brains of our smart home server it’s smart enough to suggest the right card type – camera, and we can just add it to our layout.
Tweaking the Settings
With the cards on the layout we can now see what the camera(s) see through the Lovelace UI in Home Assistant. But before we leave edit mode for Lovelace, let’s change one more setting. Let’s bring up the setting for the card by hitting the edit button and for Camera View let’s select live as shown below;
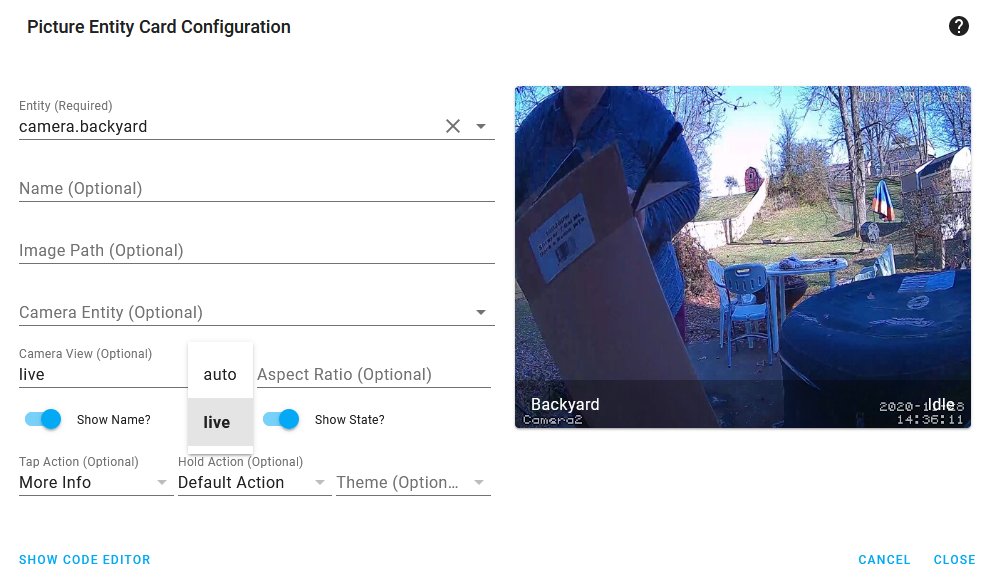
In the card preview we should see the change immediately when we make it – if there is motion outside on the camera. While we are here we can set other options for the card such as the name if we’d like now.
We’re done!
That’s pretty much it – we have our camera hacked and certainly not sending data to China. We also have setup MotionEye in order to start our own security/motion detection service (which we’ll do in detail in another post). And now we have too our camera(s) in Home Assistant so that we can view them while we’re setting the home automation or even on the go.
But There’s More? (Bonus Tip)
If you notice in the screenshot above I’m using icons for my Lovelace tabs in place of labels or names. Here is how I have it setup if you’re interested in the design/styling of my Home Assistant setup.

- Touch – Main screen, with the most common options.
- Material icon: mdi:gesture-double-tap
- Lights – Self explanatory, holds my 15 lights and some of my smart switches
- Material icon: mdi:lightbulb-on-outline
- Sensors – Main page for all my Zigbee sensors.
- Material icon: mdi:leak
- Cameras – The topic of this post, where I can view my security cameras.
- Material icon: mdi:cctv
- Cloud – My router throughput, NZBGet queue, Sonarr upcoming shows and trackers of certificate expiry.
- Material icon: mdi:cloud-outline
- Media – My Roku devices, Chromecasts, Google Home Minis, Plex Recently added and more.
- Material icon: mdi:play-network-outline
That’s it – we’re all setup with the Yi cam outdoor, MotionEye and Home Assistant. As mentioned we’ll look at the MotionEye UI configuration in another post and even look at how MotionEye can call Node-RED and send an event to our phones with Home Assistant’s notification service.


